Monday, September 27, 2010

Play & Display Your Pumpkins!

I LOVE Fall, and I know so many of us do, I think it incorporates a whole new dimension in home decorating.  Incorporating natural elements with our everyday style is FUN, different and quite frankly something we can change up every year.  Because, for the most part, we purchase pumpkins that are appealing to us for one use or another.  A particular pumpkin could appeal to us as a vase, as a base for a stacking pumpkin display, or perhaps as part of a centerpiece.  Any way we use pumpkins, we should have fun with it!  If you find a pumpkin that is a perfect color, shape and size and you want to use it from now through Thanksgiving, don't cut into it.  Instead spray it with a satin sealer spray and it could last for up to 8 months.  Unfortunately you won't want to use pumpkins in your display come June . . . or would you?  YOU are such a renagade!   I hope you find some of the example shown inspiring, different and something you will give a try this year! 
Pumpkin picks

For carving: The quintessential pumpkin has a rich orange hue, medium to large size and strong handle. Look for varieties such as Howden Field (15-30 pounds), Magic Lantern (15-25 pounds) and Autumn Gold (8-15 pounds).

For painting: Pumpkins with smooth skins are best for painting or decoupage. Try varieties such as Lumina (10-15 pounds, white) or Baby Pam (4-5 pounds, orange).

For color contrast: Pumpkins look artsy in exotic and two-tone colors; no additional ornamentation needed. Look for Cinderella (25-30 pounds, dark orange/red color with deep ridges, Jarrahdale (9 pounds, with blue/green or slate gray skin), Hooligan (miniature with orange and white mottled colors), Fairytale (15 pounds, with rich mahogany brown color) and Batwing (1/4 pound, with orange and green coloring).


 Consider utilizing your pumpkin for a wine chiller or a dip bowl . . .


 Ribbon glued to mini pumpkins create an ornamental effect, fun and whimsical.  Without cutting into these pumpkins they can be used for Thanksgiving as placecard holders.

 Decopage pumpkins, real or paper mache.

How simple to place some (very) miniature pumkins under stemware and top with candles!


Pumpkin topiaries

Turn miniature pumpkins into tabletop topiaries accented with raffia bows.
Hot-glue a piece of Styrofoam into a 4-inch terra-cotta pot. Push a sharpened dowel or tree branch into the bottom of a miniature pumpkin, and push the other end into the Styrofoam. Secure with glue if needed. Spread dried beans or peas over the top of the Styrofoam, gluing if necessary. Tie a raffia bow around the dowel just below the pumpkin


Message tower

Send your guests a spooky message with this towering display.
Sketch the outline of the letters freehand, then scrape off the pumpkin skin to highlight each letter. Stack the pumpkins on a dowel near your entryway.
Pumpkin welcome

Greet your guests at the door with a pumpkin house-number sign.
Stack small, medium and large Cinderella pumpkins (remove stems, except for the top one). Then use a stencil and crafts knife to trace the outlines of your address numbers. Scrape the pumpkin skin out of the stenciled numbers, revealing the lighter pumpkin flesh underneath. 
Tabletop 'Mumkins'

Combine two fall favorites by turning a pumpkin into a bursting-with-mums flower arrangement.
Begin carving as you would with a jack-o-lantern. Carefully cut a lid (keep the stem!) and remove the seeds and pulp. Using a drill or nail, poke small holes around the shell, just wide enough to insert flower stems. Select mums in oranges, reds and golds. Cut the stems about a half inch from the flower head, long enough to poke into the hole. Space holes so adjoining flowers cover the pumpkin flesh. Start at the top, and work your way down until the pumpkin is covered.
The number of mums you need depends on the sizes of the blooms and your pumpkin. Keep the inside of the pumpkin moist; flowers will last two or three days.   You can also recreate the same look just using a floral foam ball, pumpkin stem and flowers.  No need for a pumpkin for this creative project.

Pumpkin table runner
Create a fresh-from-the-patch table runner in just a couple of minutes.
Arrange a line of miniature pumpkins or gourds down the center of the table and weave a ribbon around them. Top with a bittersweet stem.
Black magic

Create black-and-orange etched designs on three or four pumpkins for a bewitching display. Carve out one to hold a vase full of flowers.
To start, spray-paint the pumpkins a matte black finish. (Protect the stems with tape.) When the pumpkins are dry, use a paring knife to scrape away the painted surface in vertical or horizontal lines. Or etch a simple shape or pattern, such as the sun or a zigzag.
Knock-out design

Whimsical dots create a two-tone or multicolor design with season-long appeal.
Use a plunger-type apple corer to punch out circles from an assortment of pumpkins and winter squash. Tapping the plunger with a rubber mallet helps push the corer through tough pumpkin shells. Then re-insert the circles in contrasting-color pumpkins. Mix and match the circles from different pumpkins to create polka-dot patterns, or discard circles to let light glow through your design
Patchwork pumpkins
Like working with a three-dimensional quilt, you can mix and match cut shapes from different-colored pumpkins for a custom look. Here orange squares make a checkerboard pattern in a white Lumina pumpkin.
Scoop out the insides, then cut identical shapes out of two pumpkins. Switch the pieces.
It's important that pieces to be exchanged are of the same size. For a precise edge, you can use tools such as metal cookie cutters, biscuit cutters and an apple corer to help with your cutting. For a more handcrafted look, design your own template.

Create a patchwork and paint display
Set a seasonal scene on your porch or patio using our patchwork and paint techniques to create a beautiful grouping of pumpkins. Add flowers, fall leaves, small pumpkins and fresh vegetables to embellish your inspiring display.

Flower power

Summer still blooms when you translate flower motifs to autumn pumpkins.
Use an apple corer to cut flower centers, and carve petal designs with a triangle clay loop tool, available at some crafts stores or through pottery supply stores online. Swap flower centers among different-color pumpkins for whimsical contrast.

Painted leaf art

Painted pumpkins offer the fun of seasonal decorations without the mess of traditional carving. To put your painting in the spotlight, add your designs to unusual squash or pumpkin cultivars, like this striking blue-green Jarrahdale pumpkin at left. See slide 16 for an inspiring list of different types of pumpkins to look for.
To paint any pumpkin, start with one that is clean and dry. Lightly sand the surface and apply paint sealer to prevent flaking. Create a design with stencils and acrylic paint, such as the leaf stencil and orange and white paints used here, then finish with a top-coat sealer.

Natural display

A pumpkin "basket" makes an imaginative centerpiece for a fall table.
Here, a large white pumpkin holds an arrangement of fall flowers and berries, as well as a white candle nestled in the center. Hollow out the pumpkin, then place a block of wet floral foam inside. Position a pillar candle in the foam and surround with fall blooms.
Try using your pumpkin as a planter or vase. Add a large place bag inside prior to adding soil or water. 
Remove the tops of the pumpkins and hollow out the insides to make fall vases. Place a watertight container inside each pumpkin to keep flowers fresh and prevent pumpkins from getting soggy.


Window dressing

An assortment of mini pumpkins and fresh fall leaves creates a pretty fall window swag.  Knot your fall bounty on a length of rustic twine, and swag across your panes to frame a pretty autumn view
Pumpkin place cards

Small pumpkins add a fresh touch to a fall table setting. And they're not afraid to work as place cards while they're looking pretty.
Start by inscribing colorful leaves with your guests' names. Then tie the foliage to mini pumpkins with raffia or twine.

Inner glow

Miniature Baby Boo, Jack-Be-Little and Sweetie Pie pumpkins become perfect candleholders when hollowed out for votives.
We used old pitchforks, rake heads and an antique apple picker as simple wall sconces (see previous slide for the complete display).
Safety note: Always place leaves at least 3 inches from flames, and never leave burning candles unattended.

Accent your home with pumpkin characters of the residents . . .

 
 From the elaborate
 To the simple - don't forget grandma!
Elegant white

Pair all-white or orange-stripe pumpkins with white tableware for a soft, elegant look.
All-white pumpkin varieties include 'Lumina', 'Baby Boo' and 'Moonshine'. Try 'Lil' Pump-Ke-Mon' for a miniature pumpkin with creamy color accented by bright orange stripes.Similiarily to how the basic white is used, try clear glass. . .


Easy centerpiece

Make a fuss-free centerpiece by displaying several pumpkins or gourds on the table.
Our arrangement uses a long white platter, but a basket or tray would work well, too. Add a few leaves, berry clusters or flowers for color and texture.

For other Imaginative Pumpkin "ART" with carving your pumpkin . . . check out Play with Your Pumpkins at your local library.  A real "treat"!


Contact me anytime. You can shop on my website to your heart’s content. I will ensure you get all the discounts you deserve♥

http://susiev.willowhouse.com/
Susie.VanDeventer@gmail.com
214-212-5134

Saturday, September 25, 2010

WAY TO DISPLAY (and clear up the clutter!)

Our Gramercy Double Dish Stand. You can use the Gramercy stand with the Italian Stitch Salad Plates, Bowls (one of each shown here).

or you can choose to stack the Villa Salad Plates in this piece for easy buffet style serving.
Stand such as this are a GREAT way to make optimal use of your space, especially when you are entertaining. The Gramercy stand in particular is great for appetizers – you can get twice the food in one space. Serve a plate of sweet treats both top and bottom or mix it up by placing crackers on the bottom and cheese on the top. Because the Italian Stitch plates and bowls fit in both the top and the bottom, you can mix and match based on what you are serving. Try using the Double Dish Stand as a chaffing dish or a fondue pot. The Italian Stitch Square Salad plates and bowls fit perfectly on the stand; and because they are oven, microwave and dishwasher safe, they are ideal to use for hot appetizers or desserts.

  I like to take the bottom dish, add coffee beans and tea lights, keeping it decorative yet functional. In the top dish you can prepare your favorite HOT Dip – Cheese, beans, artichoke, caramel or chocolate. You can also put store bought brownies or cookies (NO ONE has to KNOW) on the top dish or bowl and heat from the tea lights will warm and soften them so they will smell like they just came out of the oven.
 Remember – the Italian Stitch is oven safe! Using the Salad Plates, buy pizza crust dough, unroll it and cut into 4 squares. Form the dough onto four salad plates for four individual pizzas. Then allow each person to add their own toppings. Bake and serve all on the same plate! Your kids will love this (adults too!). Now the square bowls – these are fantastic for warm chocolate chip sundaes! Buy a tube of refrigerated cookie dough. Press the dough on the bottom of the salad bowl and bake. Serve it warm with a scoop or two of ice cream and a drizzle of hot fudge. I promise – this dessert will be a huge hit!


Want to impress your family with a great dessert that takes almost zero effort? Open a jar of caramel sauce, pour into your Italian Stitch Square Bowl, zap it in your microwave. Slice up some apples and there you have it – tea lights on the bottom, caramel on the top, serving sliced apples on the side.


Now many of us have limited storage space, and really, who would want to hide our beautiful product behind cupboard doors? The Double Dish Stand is a wonderful organizer to boot.

Probably one of the most sought after items in our households are “the keys”. How many of you often hear “mom” or “honey, where are my keys?” The Double Dish Stand can be beautifully displayed in an entry hall. I use the Italian Stitch Square Bowls in both the bottom and top tier of the stand. The bottom dish can be left open to hold those ever missing keys and in the top you could display a small plant, some pretty sea-glass and shells or stones and a candle – or perhaps some bite size candy bars for a little treat as you walk out the door. The stand can be left on the counter in your kitchen or a sideboard in your dining room. Plus you can store salad plates on it, keeping in mind that having plates easy to reach will mean you are most likely to grab them and salad plates will help you keep portions small.

You could even use one of these stands in the bathroom. Keep small, attractive soaps in the top tier with rolled up face or hand towels in the lower tier. Having guest over soon? Put the stand in their bedroom and fill with little snacks

Whew! The Gramercy Double Dish Stand $36.96
14.5 x 9.5" tall

A purchase of $39.96 or more is all you need to select any product under $40 for 50% off! This is how we Treat our customers’ everyday – no Tricks!

The possibilities are endless (especially since we have over 160 items to choose from at 50% off)! These are just A Few IDEAS to get you mind cranking!

Contact me anytime. You can shop on my website to your heart’s content. I will ensure you get all the discounts you deserve♥

http://susiev.willowhouse.com/
Susie.VanDeventer@gmail.com

Thursday, September 23, 2010

What Women Need, and Why Willow House, Why Now?

Upon looking at some of the leaders within Willow House and "why" they chose to join direct sales, you will find many different reasons.  Perhaps it was a passion for young mothers who wanted to leave the business world and stay at home and raise their own kids. Then, the passion for retirement and aging women...the average age of widows in today's world is 56.  Women NEEDING extra income especially as they got older. Perhaps a "why" is helping women grow personally and professionally through direct sales and owning their own businesses.  Or another "why" is to help women find financial freedom.  Or another still might be passion, what drives me- is home.
I have a deep deep heart for the home but I must share with you that Willow House is not about "decorating and entertaining" for me.  IT HAS TO BE ABOUT MORE THAN THAT FOR ME. Somewhere down the road, I have learned that I can create a "home" wherever I am - in an apartment, in a hotel, in a half million dollar home. "Home" is a place of safety and refuge. It is a place to feed my family's soul. I am more interested in helping people design a lifestyle around warmth and comfort and solace.  It is unfortunate, families today are driven by fear, distrust of our government, and disbelief. One million families will lose their homes this year in foreclosure because our housing industry is BROKEN. In a good economy, that number is about 10,000. In 2010- it's ONE MILLION. Dear Lord...where are these people going to go?  The "need" for the food pantry is up 200%!  You may have thought you knew what the homeless looked like. The homeless looks just like us.

More and more families come "home" to rest and think. Home has to be where we come to cuddle and laugh and take care of each other. Home is where I teach my children that God hears the prayers of their hearts and it's safe to tell Him everything we're feeling. As a wife, and a mother and a woman, home is where I plan, and create and bless, and nurture, and re-cooperate and find the strength to get up and do it all over again.


So WHERE does Willow House fit in? WHERE is Willow House relevant?


Here it is. Beauty. Beauty heals. Beauty elevates the simple. Beauty re-stores and blesses and women NEED it. It is a NEED just like air, food, water.. (there is the need). Women need it and will continue to buy beautiful things to surround their world in. And women NEED 3 other things that we offer, too.

Women need Flexibility. Knowing what I know now about flexibility, this benefit is almost as important as income. To be able to make my own hours, work around my family's schedule almost sounds like a fairy tale...but it's real...and it's something we can offer.


Besides flexibility, Women Need Security.  Willow House is relevant because I have total control over my income. Contrary to popular thought, we DO have control over our incomes. We are not powerless.  We have been empowered with such great training and support.  Willow House offers the finest personal development program available and the only advanced design curriculum in the industry.  Willow House provides our business supplies.  Willow House pays all credit card processing fees, Willow House pays for all our Host Incentives.  Willow House pays for all of our special incentives.  Willow House is a Debt Free Company!  I love that I do not need to worry about my future with Willow House!


Lastly, I am burning up with desire to empower other women. As frightening as this world is, we are not victims. Women are a lot stronger than they think they are and a lot smarter. I want to help other women gain CONFIDENCE, SELF WORTH, and ASSURANCE.


At this point you may be thinking to yourself . . . this is all heavy. Why are you sharing all this with me today?

Discover or re-discover what you are passionate about TODAY...
At Willow House We Have
  1. The Power of Social Media to become America's FIRST Community Commerce Business.
  2. 25% INSTANT Paycheck the day (or night) of your party, or eCommerce order.
  3. 5% Business Supply Credit, based on your sales.  Instantly placed into your personal business supply account by Willow House, so you never have to pay for a catalog, style guide, order form etc.
  4. Totally FREE Hostess Rewards Program!
  5. No Inventory, No Deliveries, No Kidding!
  6. Online Ordering and FREE Willow House Community with Willow House Virtual Villages.
  7. No Credit Card Processing Charges.  We take all credit cards, and Design Consultants pay Nothing!
  8. Great Incentives that EVERYONE can earn!
We are the first Community Commerce Business Model in the United States. This Business Model includes 3 main components:

• Design-based Party Plan
• Enhanced eCommerce
• Media-Rich Online Community

Design-Based Party Plan Offers:
Design Emphasis on our products, and on "dressing" your home.
Sharing Tips and Ideas
Helping Hosts and Guests Discover their personal Styles
Providing Inspiration Guides (part of the starter kit and business supplies) and on-trend tips in companion piece (part of workstation)
Building self-esteem by helping Design Consultants Learn about Design. We are launching a full design curriculum for those that want to advance their design training.
Connecting with online community eCommerce.

Enhanced eCommerce Offers:
OnLine Ordering (October 1)
eBoutiques offering beautifully styled, high value products (coming early 2011)
Reverse auctions encourage more visitors to get the best price. Have your heard of Woot?
eOutlets: sharing discontinued and excess inventory products (October 1)
Co-owned by company and Design Consultants.
Host benefit from sharing.

Media-Rich Online Community Offers (all starting in December):
Innovative virtual community.
Hundreds of videos, search engine
The best blogs and home decor, design and entertaining
Connecting with those who don't attend parties
Willow House Live TV
Multiple sites, opportunities for information.

We truely are the next generation of direct sales and are helping people all across America start home-based businesses. We are leveraging social media wit this new business model. Combining these three elements eliminates each of their potential weaknesses while capturing their strengths.

Through September 30th you can OWN a business for $99 and get paid the day you party, or take orders. ENJOY training (yes I said enjoy), learning more about how to bring comfort to Your Home and help others do the same!  Develop Amazing Friendships all over the United States that will last a LIFETIME!  Take Amazing Trips that you have EARNED, not PAID FOR, but EARNED FOR FREE! PLUS...LOVE WHAT YOU DO Every Day of the Week! 
Consider This . . .

With Willow House, I earn over $45 an hour! When I do 4 shows a month, I work on average about 20 hours a month and earn around $900 just by going to a party!

Willow House vs. The Part Time Job
Part Time Job:
20 hrs/week (80 hours month) @ $10/hr = $800 a month

Willow House:
20 hrs/month @ $45/hr = $900 a month (not including bonuses like team royalties, free gift cards, monthly fuel bonus, free vacations and PIP bonus income as part of our leadership program.

Isn't it TIME Your LIFE Lived Up To YOUR POTENTIAL?

So...what are you waiting for...get started TODAY!

http://susiev.willowhouse.com/  214-212-5134    Susie.VanDeventer@gmail.com

Wednesday, September 15, 2010

Fall Decorating in America's Heartland

The rich colors of autumn set the tone for decorating with gourds, leaves, pumpkins and other seasonal materials.
Gourd vases
Gourds come in all shapes and colors and easily become seasonal vases. Cut a hole big enough to accommodate a couple of florist tubes. Insert flower stems for a unique bud vase.

Eerie entry
Greet your guests with ghostly gourds this season, cleverly decorating your stoop to show your holiday spirit.
Just a little paint will transform fall produce into eerie apparitions. Start by covering your gourd with acrylic spray varnish. Use acrylic crafts paints to create your design. Finish with another coat of spray varnish.
To hang each gourd, drill a small hole through the top of the neck and thread florist's wire through it. Finish your display with dried vines, bittersweet berries and maybe even an abandoned paper-wasp nest.
Corn on a rake
Put an old garden rake to use as an autumnal door display. Just add ears of multicolor maize. To secure, push each ear of corn between the teeth of the rake. Hang near your front entry with a hook, or prop it against a nearby wall. You'll have a festive fall look in minutes.

Floating display
Clear glass containers highlight the seasonal beauty of smooth pumpkins and frilly flowers in this unusual--and ultra quick--display.
Fill an assortment of glasses with water and float mini pumpkins along with Teddy Bear sunflowers or other autumn blooms.

Harvest table
An easy grouping of seasonal items and colors brings autumn to your tabletop.
Orange and white pumpkins plus yellow chrysanthemums in a sunny yellow container create an eye-catching centerpiece. Elevate some of the pumpkins for added flair.

Glowing balls
Fashion a spooky tabletop display that starts with easy-to-make plaster-cloth spheres.
Wrap plaster-cloth strips (from a crafts store) around a balloon, following the directions on the plaster-cloth package. Leave open spaces as you wrap. When dry, remove the balloon and use a crafts knife to cut an opening for inserting the light. Place sphere over an orange or white battery-operated votive. Set your spheres on clear glass cake stands or similar displays.

Bountiful wheelbarrow
Put together a colorful outdoor fall display using a sturdy wheelbarrow as a base.
Our wheelbarrow overflows with ornamental cabbage and peppers, ornamental grasses, chrysanthemums, flowering zucchini and other seasonal plants. Fill the wheelbarrow with soil and insert the plants loosely, or tuck containers into the wheelbarrow, making sure to fill in the gaps with more plants

Gourd beauty
Unusual combinations of pedestals and gourds make an easy and novel centerpiece.
White gourds look like miniature sculptures when placed on pieces of old table legs and balusters. Other items to try as pedestals: upside-down bowls, old candlesticks, decorative nesting boxes, Mason jars--use your imagination!

Two shades of gold
A wheat wreath reflects your Midwest heritage. Insert dried sheaves into a foam wreath form, then dress up your wreath by slipping the stems of golden maple leaves into the spaces between wheat heads. Use leaves sparingly for the best effect.

Nuts for decoration
Nuts, beautiful in their natural state, are as easy to decorate with as they are good to eat. Here, they anchor a candle inside a hurricane lamp. Experiment with different varieties of nuts and a selection of clear containers.
Golden glow
Clear glass containers show off both the flicker of candles as well as the colorful materials around them.
Nestle a candle in popcorn kernels or other seasonal materials such as candy corn or colored clear round stones (available in crafts stores).

Nesting nuts and flowers
Tiers adds drama to your centerpiece. Tuck a small glass bowl of rose heads inside larger containers of mixed nuts.

Branches and fruits
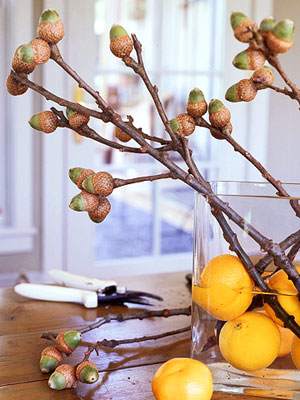
Snips of fall branches make easy--and inexpensive--arrangements.
Look for interesting shapes with leaves, acorns or berries. Add fruit such as lemons in the base of your container for both color and stability.
Highlight nature
Create simple but striking arrangements with autumn beauties. Try cattails, ornamental grasses, coneflower seed heads or dried hydrangea blooms.
Natural vase
A creatively cut pumpkin "basket" makes an imaginative centerpiece for a fall table.
Cut out two top quarters of the pumpkin, leaving the stem and a narrow strip as the basket "handle." Zigzag the bottom edges, and hollow out the base. Place a block of wet floral foam inside. Position two glass votive holders in the foam and surround with a bevy of fall blooms and leaves.

Creative runner
You might have trouble keeping the piles of foliage outside in order, but these leaves march in perfect rows across a table runner.
Use a stencil or rubber stamp and fabric or crafts paint to decorate a plain linen cloth. Follow instructions on the paint container for setting and washing the finished design. The same technique can be used to create other fall linens for your home, such as hand towels or even pillowcases.
Harvest centerpiece
A short branch makes a striking centerpiece for an autumn party.
Weight a pot with stones and fill with florist's foam to secure the branch, then wrap the pot in a drawstring jute bag. Pair the arrangement with flowers and plants in leaf-inspired colors -- we used roses, millet, kale, leaves and berries
A picture of fall
For an easy mantel display, combine brightly colored fall leaves with an empty picture frame.
Hang leaves on S-hooks (used for jewelry making and found at crafts stores) or pin to a ribbon. Put nails in both sides of a colorful frame and suspend the ribbon loosely across the center, tying it to the nails. Add to the display by spreading a branch full of brightly colored berries across the length of the mantel and setting small gourds on top of egg cups.
Mantel of gourds
Use as many gourds as you'd like to create this simple mantel decoration. We mixed two larger hard-shell gourds with smaller soft-shell gourds (and tucked in a squash for good measure). Bittersweet branches and maple leaves provide extra color and texture.

Tuesday, September 14, 2010

Fabulous Fall Wreaths

It has been said that your front door is the "centerpiece to your home" a focal point that deserves a crown.   Welcome the fall season, and friends and neighbors, into your home with door decorations using ornamental corn, gourds, pumpkins and other autumn materials.

This Wreath was created by Midwest Living to respresent South Dakota.  I am a sucker for pheasant feathers and find this wreath to be warm and welcoming.  To recreate it, begin with a pre-made twig wreath (ours was 22 inches wide). Using hot glue and a glue gun, attach tiny pheasant pinfeathers to a few twig ends. Using hot glue, attach Brazil nuts (found in grocery stores) around the center opening. Insert medium-size pheasant feathers, all facing the same direction as the twigs. Attach with hot glue. About a dozen long tail feathers are used in the lower third of the wreath. Divide the feathers, using half on one side, half on the other, gluing them horizontally so they resemble whiskers on a cat-s face. A large bow of brown satin, attached with florist-s wire, is centered above the large feathers.

Fall color wreath
Create this beautiful fall wreath with a variety of materials that reflect autumn's hues: gold, red, orange and brown.
Both your yard and a crafts store should provide a bounty of choices. A mix of fresh and dried materials looks lovely, but a wreath of all dried materials lasts longer.
Lightly soak a 10- or 12-inch ring of Oasis floral foam in water. Group your materials by color to plan each section of the wreath, then insert materials by the stems. We used tree leaves and fresh mums for red and orange bands of color, tree leaves and dried yarrow for gold, and dried oak leaves and pinecones for brown. Hot glue or T-pins help hold materials in place.

Bittersweet wreath
A cluster of six gourds stars in this festive autumn wreath. Wrap extra raffia (the fiber from palm leaf stalks) around the top of each gourd and tie them together in a cluster. Attach gourds to a circle of bittersweet. Top it all off with a raffia bow.


U-shape wreath
The unusual shape of this harvest-themed wreath makes it a standout door decoration.
Cut away about one-fifth of a plastic foam wreath to create the shape. Wrap yellow seam-binding ribbon around the wreath. Hot-glue fresh or preserved green salal leaves (commonly called lemon leaf) to the wreath, covering it completely. Glue a cluster of nuts to the bottom center, then add dried wheat, preserved fern fronds, and fresh or silk berries.


Sunburst wreath
Mimic a blazing sunburst with this fall wreath. Fold out the husks on ears of Indian corn so they point straight out from the tops. Hot-glue the ears to a straw wreath, and "fluff" the husks to complete the look.

Wheat wreath
A wheat wreath reflects your Midwest heritage. Insert dried sheaves into a foam wreath form, then dress up your wreath by slipping the stems of golden maple leaves into the spaces between wheat heads. Use leaves sparingly for the best effect.

Acorn ring wreath
Combine moss and acorns to create a simple but lovely fall wreath. Hot-glue moss to a small wire or cardboard ring, then glue acorns to the ring. If needed, secure the acorns to their caps with glue. Hang with a satin ribbon.

Wheat and flowers decor
Bundle wheat with sunflowers and a ribbon bow for a quick-and-easy fall door decoration.

Nuts and leaf wreath
Use a variety of inexpensive fall materials to create this autumn wreath. Just hot-glue artificial leaves, walnuts and hazelnuts (or other hard-shell nuts) in a ring around the front of a grapevine wreath.

Bright leaf wreath
The shape of this wreath makes it distinctive. Use U-shaped pins to attach moss onto a foam wreath form, then hot-glue preserved or artificial leaves. Hang a small pumpkin ornament in the center.

Birchbark Bounty
A hanging birch basket (you can buy one at florists shops or crafts stores) cradles a bounty of fall fruits and foliage. Fill with two or three small gourds, five ears of ornamental corn and 10 wheat stems. Then, add small amounts of rosehips, maple and oak leaves, as well as sorghum and acacia foliage.

Fall plate wreath
For a quick-and-easy wreath, hot-glue pressed leaves (or leaves from a crafts store) around the edge of a platter and hang with a plate hook. The glue peels right off when you want the platter back

Ornamental corn braid
A harvest of multi-colored ornamental corn highlights this simple wall hanging. Wrap thick strands of rust- and natural-colored raffia around the husks of 10 to 12 ears of corn, leaving approximately 1 foot of excess raffia at the end. Braid the ends together. Finish with a raffia bow and bittersweet branches.

Maidenhair fern swag
A fistful of dried maidenhair ferns (about 2 feet long) and a couple of branches of acacia foliage form the base of this delicate autumn swag. Using plenty of raffia, attach four small ornamental ears of corn and nine stems of wheat to the swag. If you like, you can substitute sweet Annie branches for the acacia foliage.