Saturday, November 6, 2010

Creatively Speaking ::: "How to Give Thanks"

This Thanksgiving, enjoy these simple crafts and ideas for encouraging friends and family to give thanks. A special bonus: Some ideas help keep kids occupied while the adults are busy.

Thankful Centerpiece
Make decorating the table a group effort. For the centerpiece, fill a serving platter with unshelled nuts, arrange colorful fruit on top, and insert artificial berry sprigs. Then ask guests to add to the arrangement by writing what they are thankful for on paper leaves and tucking them into the centerpiece.
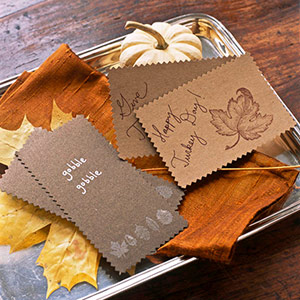
Card Game
To facilitate the thankful spirit, create gratitude cards using scrapbooking paper and supplies. Cut out cards from scrapbooking papers using decorative-edge scissors and embellish with stamps, stickers, etc. Give the cards to guests before dinner and ask them to write what they are thankful for. As the meal begins to wind down, ask people to share their thoughts.

Drink Tags
Punch out a leaf-shape pattern onto fall-color papers, and punch a hole at the base of each leaf. Ask guests to pick a leaf and write a word or short phrase describing something they're thankful for, such as "family" or "good health." Attach leaves to the wineglass stems using lengths of gold cord or raffia.

Simple Notes
Express your gratitude for individual guests with a quick note of thanks. Write guest's name on the front of a thank-you card (look for affordable boxed cards at crafts stores in the stationery aisle. Write a heartfelt note to the individual inside the card and use it as a place card for the table.

Glowing Review
Light up the table with candle place cards. Wrap a wide strip of patterned paper around a glass candleholder, securing the overlapping ends with double-sided tape. On a narrower strip of complementary paper, write guest's name, along with a simple sentence expressing your gratitude. Layer the strip over the patterned-paper strip and secure the overlapping ends with double-sided tape. Insert a candle and light right before dinner.

Conversation Piece
Spark a discussion about gratitude with these small cards. Print inspirational quotes onto cardstock and cutout into rectangles. Place the cards in sleevelike envelopes (available with cardmaking supplies at crafts stores). Add a card to each place setting and have each guest read aloud at the Thanksgiving feast.

Garden Variety
Start a Thanksgiving-tree tradition with your family and friends. Assemble the tree before the big day, along with blank paper ornaments. As your guests gather, ask them to write a message of gratitude on an ornament and hang it on the tree.

Make a Tree of Thanks for Fall
Invite family and friends to write meaningful messages on this pretty tree perfect for fall and Thanksgiving decorating.
What You Need:
•Tree branch
•Handheld hedge clippers
•Butter tub
•Cement
•Water
•Disposable container
•Hot-glue gun and glue sticks
•Chickpeas or dried beans
•Spray primer
•Orange spray paint
•Clear spray sealer
•Orange glitter
•Scissors
•Decorative container
•Decorative rocks and silk leaves
•Papers in green and gold
•Paper trimmer
•Glue
•Marking pen
•Shower curtain clips
-----------
How to Make It:
1.Trim a dry dead branch to the desired size and shape using hedge clippers. If needed, combine several small branches.

2.Choose a container, such as a butter tub, that can be hidden in a decorative container and filled with cement.

3.Following the instructions on the cement package, mix cement in a separate disposable container. Pour the cement into the butter tub.

4.Insert the branch base into the center of the cement-filled tub. Tap the sides of the tub until the branch sits firmly in cement. Allow cement to dry.

5.Use a hot-glue gun to adhere chickpeas or dried beans randomly to the branch, using as many as desired.

6.In an outdoor area, spray the branch with primer. Spread extra chickpeas on newspaper and spray them with primer. Let the primer dry.

7.Spray-paint the branch and chickpeas with orange; let dry.

8.Spray one section at a time with clear sealer. Quickly sprinkle orange glitter onto wet sealer; let dry. Repeat this process until entire branch and chickpeas are glittered. Place the weighted tree into decorative container.

9.Place decorative rocks around the branch base until the cement is covered. Sprinkle extra chickpeas onto the rocks.

10.Trim silk leaves from stems. Coil the wired ends and hang on the tree.

11.Trim 2-inch squares of green paper and 13?4-inch squares of gold paper. Center and glue the gold paper onto the green paper. Ask family members to use a marking pen to write meaningful messages on the squares. Use shower curtain clips to hang the messages from the branches.
12.Leave extra colored squares around the tree base for guests to add more messages to the tree.


Autumn Welcome
Pot a bare sculptural branch (we used Manzanita from a florist's shop) in a decorative pot, securing it with florist's foam or rocks. Cover the top with moss. Make color copies of fall leaves, cut out, and decoupage to cards. Punch a hole in the top, loop a piece of raffia or twine through the hole, and secure ends with a knot to make a hanger. Ask guests to write a Thanksgiving greeting on the cards and hang on the tree.

Family Tree
Gather favorite snapshots of family and friends to decorate a small potted tree for Thanksgiving. Use binder clips and pieces of twine to hang the photos on the tree as shown.

Bare Branches Transformed
No potted tree? Stick bare branches into a pitcher filled with sand or a vase filled with dried beans. Make ornaments from paper cutouts by punching a hole in the top of each one and tying ribbon through it. In addition to asking guests to share their thankful thoughts, ask them to sign their name and date their ornaments. Save the Thanksgiving ornaments as sentiments for the coming years.
Tip: Tie ribbon to sprigs of greenery to fill in bare branches and add a touch of color to your tree.

Thoughts Journal
Craft a paper journal to record a Thanksgiving celebration. Pass the journal amongst guests to capture their sentiments and memories. Start your own anthology and make a journal each year. When Thanksgiving comes around again, bring out the old journals and reminisce.

Thanksgiving Thoughts Guest Journal
Create a keepsake that will forever record cherished words of thanks.
These easy-to-craft journals are created with patterned paper, ribbon, card stock, and other craft store staples. Use it to give your holiday guests an opportunity to write down all that they're thankful for. By making the little books match your holiday table decor, you'll add a meaningful element that will enhance your Thanksgiving experience.

Instructions
To create the cover for the journal, cut a rectangle from heavy card stock and wrap it with patterned paper. Enhance the cover with a length of ribbon and a square of border sticker, then add a leaf sticker with adhesive foam at the center.
To make the pages, begin by measuring the height and width of one of the book's covers. Subtract 1/2 inch from height and 1/4 inch from the width; these will be the dimensions of the finished pages.Cut a strip of card stock that is as tall as the page height and 8 times as long as the page width. Fold accordion-style into 8 equal panels. To complete the book, glue the first and last panel to the front and back covers (see photo above).
Wall Art
Share poetic sentiments as artwork for the Thanksgiving season. Print meaningful poems or sayings (typed in an elegant font) onto cardstock. Place in frames and hang on the wall as a reminder of the season's meaning.
Tip: Adapt this idea for Christmas by printing the lyrics from favorite Christmas songs or lines from favorite Christmas stories. Display the new printouts in the same frames used for Thanksgiving.

Capture It All
Create a Thanksgiving time capsule with a three-ring binder scrapbook. Keep it easy by sticking with simple pages that focus on memories, rather than intricate scrapbooking designs. Use blank white pages for adding photos. Lined cardstock works well for recording recipes and memories.

On Display
Use mismatched salt and pepper shakers to create memory-focused Thanksgiving decorations. Start with heavy wire (slender enough to fit in the holes of the shakers) and coil one end to hold a photo. Insert the coiled wires into the shakers and secure photos to the coiled ends. Arrange on your Thanksgiving table or another prominent place where guests can admire the photos and reminisce.
Tip: Insert the wires into the shakers at an angle, which will keep them stable.

Days Gone By
Mount pictures of guests as children onto squares of paper and use as place cards. Guests will have to search for their youthful face to find their seat at the table.

Guessing Game
Attach guests' baby pictures to metal-rim tags. Hang a paper tree silhouette to a wall and pin the ornaments to the tree. Write each guest's name on a slip of paper, then ask guests to draw names and figure out which baby face corresponds with the name. Tack their best guesses to the wall next to the faces.
Tip: If you are reluctant to stick pins or tacks into the wall, use a removable glue, such as Avery's Removable Glue Stick.

Thankful Leaves
If you're hosting little ones this Thanksgiving, keep them entertained with Thanksgiving-theme art projects. Ask kids to write what they are thankful for on paper leaves. Provide crayons, markers, and stickers to use for decorating the leaves. Keep the leaves to stir conversations about Thanksgivings past.

Paper Place Mats
Simple pieces of construction paper become expressions of thankfulness. Ask kids to write the things they are thankful for on the pieces of paper, which they can use as place mats for the Thanksgiving meal.

Customized Place Mat
Keep kids occupied while they wait for the Thanksgiving meal by letting them color this special place mat. They can draw the face and fill in the blanks with interesting information to share, including what they're thankful for.
Tip: Crayons are a better choice than water-soluble markers because the place mats won't bleed if soiled with food or drink.

Crossword Place Mat
More fun for the small guests: a special Thanksgiving place mat with crossword clues related to the day.
Tip: If time allows, cover the place mats with contact paper or laminate them so they can be reused each Thanksgiving.

TO FIND Both of the Printable Placemats used about click here.

Gracious Giving
Extend the generous spirit beyond your gathering of friends and family. In the weeks before Thanksgiving, pick a charity to contribute to, such as a food pantry or homeless shelter. Ask guests to bring items to donate. (Be sure to give advance notice about the project so it's not a last minute surprise.) Place a large basket for collecting donations near the front door or close to the main Thanksgiving festivities.

Thursday, November 4, 2010

Frumpy Fireplaces BeGone!

Looking to update your frumpy fireplace.  Don't let an outdated fireplace or mantel discourage your decor.  Updating it can as easy as a fresh coat of paint, to retiling to perhaps a whole new look. 
Before: Bland and Bulky
This living room was stuck in the 1970s thanks to dusty whites and tired brown tones. The bulky brown-brick fireplace did little to enhance the space, as it was placed asymmetrically on a long stretch of wall.
After: Light and Lively
Painting the brick facade white started the process of bringing this fireplace back to life. A wood surround enhances the look. Classic-lined built-ins integrate the fireplace, bookshelves, and an entertainment unit. The surround, built-ins, and walls were also painted white to brighten the room and layer on the cottage charm.

Before: Cold and Cavelike
The former fireplace was part of a stacked-stone wall that left the living room feeling cold and cavelike. The homeowners wanted to update the fireplace and living room with modern, minimalist style, but still maintain a connection to the outdoors.
After: Open and Inviting
The homeowners did away with the stacked-stone fireplace and opted for one with a clean, contemporary design that complements the improved, light-filled living room. Sleek marble tiles combine with honey-color bird's-eye maple panels to create a one-of-a-kind fireplace and surround. These warm tones connect the room with nature and keep the focus on woodland views framed by a wall of windows (not shown).
 
Before: Muddled Media Room
With its poor design, bad acoustics, and lack of storage, this media room was more dysfunctional than family-friendly.
After: Media Room Makeover
The much-needed makeover consisted of adding a curved ceiling to balance the room and improve acoustics and relocating the fireplace to be the focal point of the room. Custom-built cabinetry flanks the fireplace, keeping media equipment organized and out of sight. Sandstone adorns the surround and blends beautifully with the built-in cabinets. The new fireplace can now be seen from the adjacent dining and living room.

Before: Ho-Hum Hearth
This basic Georgian-style white-painted wood fireplace did little to command attention and found itself dwarfed by the adjacent long, white windowless wall.
After: Refined Hearth
The new and improved fireplace showcases sophistication at its best. The new wenge-wood mantel with wainscoting runs the length of the room, commanding attention. A new broader surround is covered with an expanse of Emperador marble, which replaces the dated Georgian-style wood surround.
 
Before: Lowly Lower Lever
A huge, ugly brick hearth and a rarely used wood-burning stove cast a dark, dreary presence over this lower level. This unattractive area -- along with dated wood paneling and cement flooring -- restricted the basement to a storage space rather than a living space.
After: Lovely Lower Level
In order to create a better, brighter basement, the wood-burning stove gave way to an efficient gas fireplace. Plaster was applied to the brick wall and painted white. A limestone hearth and rustic wooden mantel complete the transformation. The new fireplace warms the room while providing a sweet, subtle focal point.

Before: Boring Brick
Nestled between large, long windows and lacking a mantel, this brick fireplace struggled to stand out.
After: Serene Stone
The new honed-marble fireplace provides subtle elegance to the living room. The tone and texture of marble was carefully selected to match bamboo flooring, natural stone, and maple built-ins seen throughout the home. This repetition of color and clean-lined materials gives the home a consistent, peaceful flow.

Before: Stuck in the '80s
In a home filled with vintage character, this fireplace was lost and out of place. The mirrored wall above and the brass fireplace look like they belonged in the 1980s. Also, a long oak shelf gave the area a low-slung, horizontal look.After: Vintage Appeal
The fresh fireplace area -- complete with built-in bookcases, trim, and an arched soffit -- give the room a been-there-forever look and feel to match the rest of the home. The old wood-burning fireplace was replaced with a convenient, energy-saving gas unit. Simple decorative moldings create the stately mantel and surround.

Before: Dark and Dominating
This rustic faux-stone fireplace was undoubtedly handsome. However, it was completely out of scale with the room because it towered uninterrupted from the floor to the ceiling.
After: Light and Cheerful
Instead of replacing the massive fireplace, the concrete stones were professionally cleaned and etched to lighten the color. With the lighter facade, the fireplace no longer dominates the room but instead sets the tone for a more cheerful family room. A wood mantel -- fashioned from an old decorative ceiling beam -- provides the perfect accent for the rustic surround.
 
Before: Much Too Busy
This fireplace didn't quite fit in with the rest of the living room. The many colors and designs of brick made the facade look busy and behind the times.
After: Simple yet Chic
The updated living room features clean, contemporary style. Because the fireplace and mantel were in good condition, all they needed was a fresh coat of white paint to blend with the style of the room. The brick on the fireplace provides subtle texture to the otherwise white room and furnishings.
 
Before: Full of Potential
This fireplace had only one fault: it was too plain. Luckily for the homeowners, it was in great condition and in working order so they wouldn't have to put much time or money into the makeover.
After: Focal Point-Worthy
Simple decorative moldings -- purchased from a home center -- create an elegant mantel and surround that complements the oversize, handsome brick hearth. The mantel and surround were painted white to brighten and bring the focus back to the fireplace.
 
Before: Dreary Facade
Dark red brick, a black-screen firebox, and flanking wood shelves gave this fireplace a dark, dated appearance.After: Fresh Facade
A fresh coat of white paint on the shelves and a coat of subtle beige for the bricks lend this facade fresh, cottage appeal. The former uninspired mantel was replaced with a shapely full-surround composed of crown molding and fluted pilasters. Crackle-finish shutters make for a charming new screen. The flanking shelves also received crown molding and new doors, and the bottom shelves were converted into charming storage benches.
Before: Uninspiring Space
This boring, brand-new family room and fireplace had no built-ins, mantels, or interesting textures to give the room character. As a result, the room felt cold and unfriendly.
After: Full of Character
A new family-friendly character was achieved with warm tones, texture, and built-ins. The Craftsman-style custom hand-fired ceramic tile and squared-off concrete slab hearth for sitting lend much-needed texture, color, and character to the fireplace. Built-in cabinetry -- also made from maple with a dark walnut stain -- flanks the fireplace, housing media equipment, games, fireplace accessories, and more.
 
Before: Basic, Boring Design
This square living room and uninspired fireplace lacked architectural interest and design pizzazz.
After: Charming, Classic Design
The now-striking fireplace surround boasts beautifully carved, white-painted moldings that frame the dark-painted fireplace bricks. The fireplace, perfectly proportioned crown moldings, white oak flooring, and a fresh, calming color palette fill the living room with charming, Cape Cod style.
 
Before: Lackluster Performance
With no mantel, texture, and too small scale, this fireplace doesn't command attention or contribute any design interest to the space.
After: Stunning in Slate
A new, taller surround made of rugged slate pairs with a white-painted wood surround that allows the texture and color of the slate to stand out. The updated fireplace also brings a warm, cozy look and feel to the soaring sitting area.

Check out this Better Homes & Garden Video for more inspiration. 

Monday, October 18, 2010

Halloween ▬ Kid Stuff? Nevermore!

If you think Halloween is strictly kids' stuff, we have one word for you: Nevermore! Scare up some of your friends for a sophisticated, grown-up party inspired by a literary master of the macabre.
Set the stage


As master of the macabre, Edgar Allan Poe makes a natural Halloween muse. His vast collection of imaginative poems and stories inspired this frightfully fun party. (If you're not into Poe, any classic horror film, character or novel can inspire a sophisticated Halloween party theme.)

Greet your party guests at the door with a scene that hints of what's to come. We wrote the classic line from Edgar Allan Poe's "The Raven" on a blackboard. (Hard black posterboard works, too.) Books feature the celebrated author's tales of terror, setting the tone of our party. A vintage typewriter puts an exclamation point on the literary theme.

Create a mood


Before dinner, let guests mingle around a wickedly indulgent wine and cheese spread, including black fruits, crackers and breads. Play classical music in the background. (Try a web search for "somber music." Our pick: Bach's "Come Sweet Death.")

Squat, stemless Cinderella pumpkins work great as pedestals for cheese trays. We chalked our own black labels for cheeses and wine bottles. Let tarnished silver pieces add to the dark ambience; use them as unique perches for small pumpkins. Spray-paint branches white or black and anchor them in tall cylindrical vases for eerie accents. Last, coat an old mirror with torn book pages and layers of decoupage medium to reflect ghostly images of your guests.

Introduce the characters


At the dinner table, white Baby Boo pumpkins and dried grapevine secure hand-cut place cards lettered with press-ons found at a crafts store. (Or draw your own freehand with a black marker.)

Turn the page


We made easy place mats by taping together Poe book pages. Layer black dessert plates (paper plates work, too) and napkins on top of your own dinnerware. A pressed leaf, topped with a personal take-home gift, adds fall color.
Let the fright begin


Give guests pocket journals, with the first page of a different classic Poe tale (such as "The Pit and the Pendulum") attached. At dinner, have guests recite a selected paragraph of their tale out loud. The horror-filled fables are certain to spark interesting conversation. Then ask them to write their own true-life scary stories in their journals for a fun roundtable recitation later.

Decorate the set


In the chandelier, a raven looms over the dinner party. We painted flea market chairs to match our black table. (But another decor option is to wrap chair backs, or drape the table, with inexpensive black fabric.) Stacks of used black books form the centerpiece. Throw pillows continue a color scheme of rust, dark green, cream and black that we pulled from various pumpkin species.

Add a few Ravens (found at Dollar Tree, Michaels, Targets, Grandinroad . . . to just name a few) to your decor.  Their eyes seem to follow you where ever you go . . . .

 They mock your inferior cage contraption!
 This guy took one for the team I guess.
are those pictures of their victims hanging from the branches as well?

adding a few stacks of books couldn't hurt either.

Stack black


Used bookstores offer a wealth of inexpensive titles. We chose only black tomes and stacked them all over the house. On the dining table, they became varied-height pedestals for pumpkins and vases of dried flowers.
Prop pumpkins


Varied-size pumpkins stacked inside lanterns make easy but clever vignettes to place around the house.

The plot sweetens


After dinner, move the storytelling away from the table with a tantalizing sideboard of dark and decadent sweets. We used a tiered server (stacked cake plates or plates on pumpkins would work as well) to offer black jelly beans, votive cups filled with licorice sticks and wrapped dark chocolates. Framed and scattered colorful dried leaves add an easy and cost-free decorative element.
Wrap it up


Send your guests home with mini takeout boxes tied with string and topped with "skeleton leaves" (all available at crafts stores). Fill each box with pretty fall-motif cookies, one last Poe tale and chocolates (hearts reminiscent of Poe's "Tell-Tale Heart," perhaps?) to remind guests of the spooky evening's events.
Majority of photos are credit to Midwest Living.  Thanks!